It's been months since I've been inside a quilting shop, or even looked around online to see what's new. I think I may have missed out on this fabric -- knitting hens -- but if anyone can find even a fat quarter for me (any color), I'd love to trade for it or buy it within reason.
Read More......Sunday, March 29, 2009
More on Sheldon and His Yarn
This is not a sad story. I have no bad news to report. I thought I'd better preface the following with a bit of a disclaimer. The last week has been very rough for John and I. Sheldon has been acting strangely: refusing my leftover cereal milk, not eating much, sleeping a lot more than usual, etc. It's been almost two years since he was diagnosed with congestive heart failure and high blood pressure, and at 15½, we thought we were about to lose him. Money is scary-tight right now, and the tests they'd want to do are completely out of our reach, plus with his health the way it is, a trip to a hospital and the battery of tests would put so much stress on his heart (he completely flips out if we go near the car) that we decided to make him comfortable, spoil him a lot, and make the most of our time.
So, we've been running to the pet store and buying up a variety of smelly canned foods to tempt him. The cat-food snob in me did a lot of cringing, but it was more important that he eat (except, still no corn, since he's allergic (read your labels - you'd be surprised to find out how much corn/corn gluten meal/etc. they slip in)). Every time he turned up his nose or threw up anything, I'd hit him with some Nutri-Cal to at least get some calories and nutrients in. Luckily for the food snob in me (not so lucky for our budget (but we continue to economize on things for us)), the kind he likes the most is the best quality we can get around here (Wellness, either beef & salmon or turkey & salmon).
There's been a lot of trial and error while we figured out the food he likes and the way he likes it served, and the other cats have been more than happy to eat the mistakes. Lily, the former basement cat, especially: she's actually been venturing into other parts of the house when canned food is on a plate. The first few days were tough, since he'd eat maybe half a teaspoon at a time.
Sheldon likes his food like so: 1 T or slightly less, smeared on a saucer (not too thin) and warmed in the microwave (Power: 2, for 10-11 seconds, just to take the chill off). I'd carry it to wherever he was in the house and guard the plate so the other cats would let him eat. After a few days of this, he started going to the same spot and just sit, waiting for his food.
A couple of days ago, I mentioned to John that I hoped Sheldon would serenade us at least one more time, so we could get it on camera. I've been meaning to do this forever, and had put it off. It looked like I waited too long; then he proved me wrong:
He's not well, and we don't know how long our reprieve is, but he's better. Which we think is fabulous.
Saturday, March 28, 2009
If I only had a gumball machine
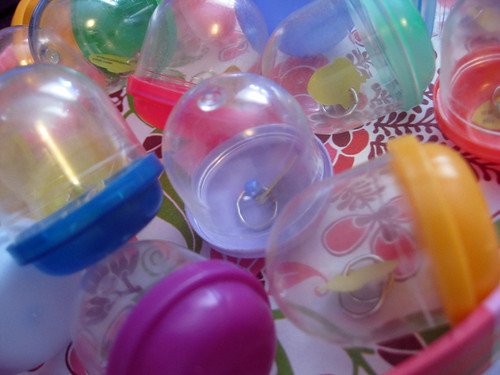
It started with this:
I picked up what turned out to be close to 300 of these little gumball capsules while thrifting. Each contained a very cheap toe ring - most of them identical - and I got a pretty ugly blister on my right index finger prying them open. I quit just past the halfway point, because of the blister, but also because I hadn't quite worked out how to do what I wanted. (I knew what I wanted to do: they would have to contain stitch markers, of course.)
The challenge was going to be tagging the stitch markers! I was patient, while my finger healed, and continued to make markers for the shop while I pondered the situation. This morning, I took a peek inside my punch drawer and spotted the little acorn, and set about tagging a set of markers while I tried to catch up on Ghost Whisperer. (Thank goodness for torrents, because CBS doesn't have anything on their site except clips, promos and webisodes!)
Anyway, without further ado: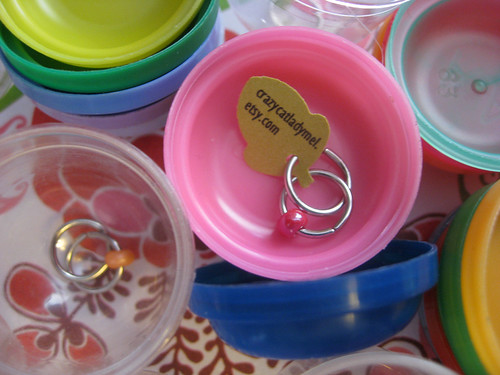
I love it when a plan comes together! These will make great knit night gifts or party favors, don't you think?
I'll also be selling batches of the gumball capsules the way they came, with the cheap toe rings, if anyone is interested.
Monday, March 16, 2009
Please Help me ID This Label?
I found this beautiful sweater while out thrifting this weekend, and have had no luck ID-ing the brand. (Googling "Hems" brings up, obviously, a bajillion results about how to hem, or describing hems.)
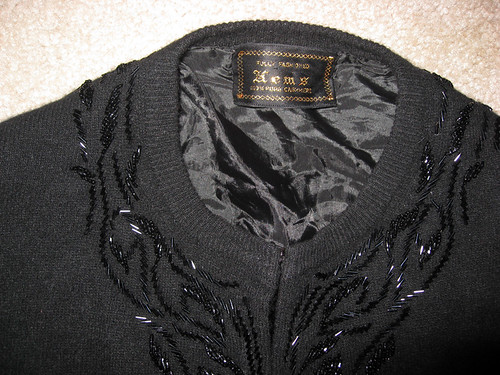
Label says:
Fully Fashioned
HEMS (I'm nearly 100% certain)
100% Pure Cashmere
The only other label is a tiny size label ("44").
Full-size view
Read More......
Fully Fashioned
HEMS (I'm nearly 100% certain)
100% Pure Cashmere
The only other label is a tiny size label ("44").
Full-size view
Saturday, March 7, 2009
Scrapbook Paper Possibilities
Oh, what you can do with a pad or two of scrapbook paper -- that has nothing to do with scrapbooking! I mentioned in a previous post that I might do a collage of all the things I've done with the 2 pads of 12x12 paper that I got on sale a couple of years ago. This is what I have pictures of -- a couple projects were done with other papers, but either have also been done with the big set or could easily be: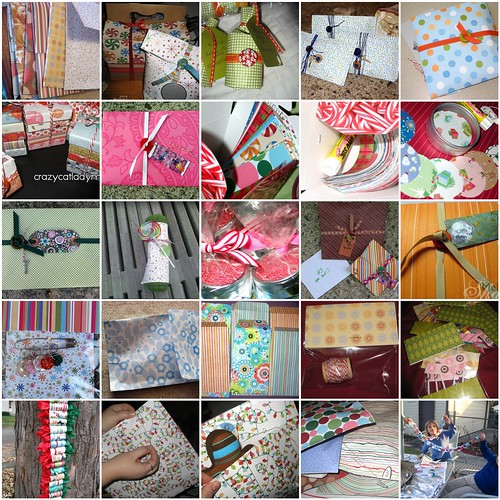 Row, by row, starting at the top left square:
1. Padded Envelopes,
2. Gift-wrapping,
3. Five Things: Acorns,
4. Small swap parcel,
5. Small birthday gift,
6. Matchbox Bundles,
7. Swap Package,
8. Paper Chain kit1, (see #25)
9. Paper Chain kit2,
10. Christmas Garland Kit,
11. Swap parcel,
12. Birthday Gift,
13. Valentine Swap, (like #10)
14. Swap parcel,
15. Buttonties7,
16. Doorprize1 ,
17. Padded Envelopes2,
18. Deed Envelopes,
19. Bakers Twine1,
20. Cupcake Flags,
21. Advent Calendar,
22. Gift Pouch1,
23. Gift Pouch2,
24. Pile o' Pouches,
25. Paper Chains
Friday, March 6, 2009

Padded Envelope Tutorial
It usually only takes one request to get me to write a tute, so since persephony4 responded to the previous post with a Yes, please, that's my cue.
These really do well as an assembly-line project; by the time you've finished gluing several, the first one should be dry and ready to fold. Apologies in advance for the lack of measurements. I really just eyeballed the whole thing.
Click any image to view it at a larger size.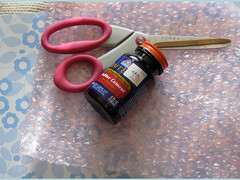 Materials
Scissors
12x12 scrapbook paper - regular weight
Bubble wrap (I save bits and pieces from other packages, you can also buy it at the Dollar Store)
Rubber Cement
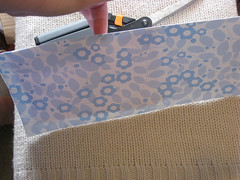
 Step 1: Cut up the bubble wrap. For each envelope, you need 2 pieces, roughly 4x6".
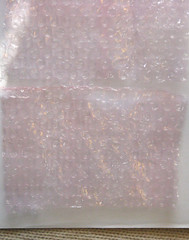
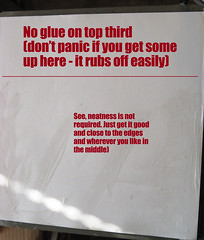 Step 2: On the reverse side of the scrapbook paper, brush on the rubber cement. Leave the top third alone. On the bottom two thirds, brush at least a 1" wide strip down the sides and across the bottom, then just randomly swirl your brush across the middle. Just a little glue will hold the bubble wrap in place -- it's more important that the edges seal well.
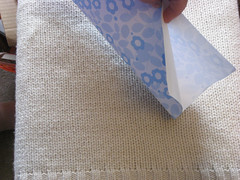
 Step 3: Lay the bubble wrap, flat side down/bubble side up, 1-2" from each edge as shown.
 Step 4: The fun part (not really); wait for the glue to completely dry. When you coat two surfaces with the cement and let them dry before sticking them together, the bond is pretty close to permanent. If you lay the sides together while the glue is wet, the bond is temporary.
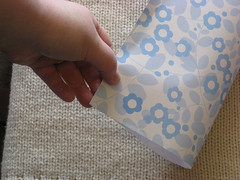 Step 5: Fold. I take the bottom corners and line them up as best as I can, then gently press the edges together, finally running my fingers down the center to crease it.
 Remember that now the glue is dry, it's not very forgiving. So be careful, but don't stress out too much: it's hard to make it exact no matter what, with the extra bulk in the center. You can see that for the demo, I had some creases. It's not the end of the world.
 Step 6: If you left the top third or so free of glue, you should now have a flat tube of sorts, sealed at the bottom and 2/3 of one side (with the fold in the middle).
 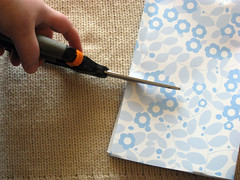 Now, figure where you want the top of the envelope to be and cut across one layer (I usually cut around the 7" mark).
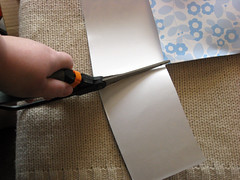 Then cut down the center to the horizontal cut and remove the rectangle.
 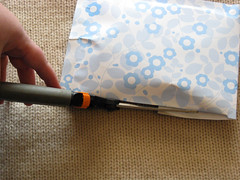 Step 7: Fold down the flap, then look for any white edges and trim.
 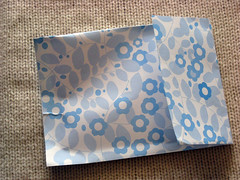 If you want to be extra sure of the edges, secure in a couple of spots with some clear packing tape. When you're ready to mail, add your small items and tape the flap shut.
Read More......
If you want to be extra sure of the edges, secure in a couple of spots with some clear packing tape. When you're ready to mail, add your small items and tape the flap shut.
Read More......
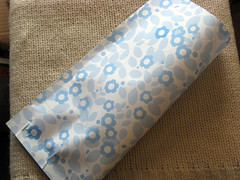
Coolest Padded Envelopes, Ever (IMHO)
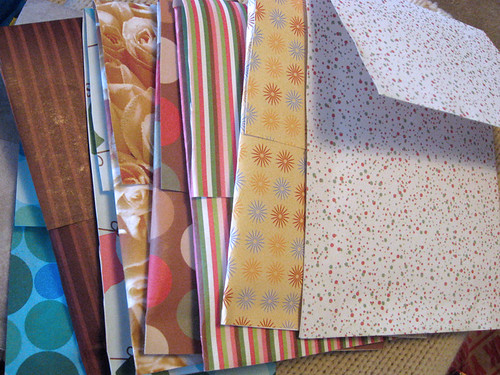
Until my ad on Ravelry is approved, I have no idea how it will impact my sales. On the off chance that it does result in some orders, I figured I'd better be prepared with some shipping solutions. I'm trying to keep shipping costs down, and one way I'm doing that is to make my own padded envelopes (above). It took me just under an hour to make the nine shown here.
These will keep shipping charges down and are cost-effective as long as I have the stuff laying around. Once I have to go start buying materials, I'll need to take another look at the practicality of it. For now, though, I can pass the savings on to my customers and keep my shipping charges down to (hopefully) as close to actual postage costs as possible. (I'm guessing at the costs right now.)
Materials (cost)
12x12" scrapbooking paper (nothing*)
Rubber cement (nothing**)
Bubble wrap (nothing -- reused from another package)
*Real cost, anywhere from 10¢ - 25¢ per sheet if bought individually. I bought 2 pads of ~100 sheets over 2 years ago, and have used them for absolutely tons of projects and packaging (I should do a collage!). I'm trying to avoid using the very obvious Christmas patterns until I have no choice.
**Reg. $2.99 a jar. I had this jar left over from doing my moving announcements. Spray adhesive would be even better, but only if it made sense financially.
I have most of the pics needed to do a tutorial, if there is any interest. Read More......
Thursday, March 5, 2009
Drive-by: Shop Update
 For a long time now, I've wanted to donate a little something to Ravelry, but am watching my money carefully and that kind of thing isn't really do-able right now. But then - ah-ha! - I had an idea: what if I bought some advertising space? If I sold a few items, that would pay for the ad, and I'd still be contributing in a way. Plus, maybe, I'd sell a few things. Sounds like a plan. So, I have an ad pending, that I will post once it's approved, to go into 3 or 4 groups that I participate in that are large enough for an ad to make sense.
Note: advertising on Ravelry can be very reasonable, cost-wise. It depends on the ads you place. Some ads, like the kind I'm going with, are charged based on the number of page views (by the thousand) and you can enter a budget, so you don't spend more than you want.
Then I spent the afternoon photographing and posting. The only thing left for me to do is to make up some Seek 'n Find "kits" (small baggie full of toys - you add your own bottle and some rice). But everything else I had ready is up: crazycatladymel's shop.
Hope everyone is doing well! I'm hanging in there. Have had a few interviews, and hope to hear some good news soon.
Monday, March 2, 2009
Still Here
I'm still around, but haven't been much in the mood for blogging. Hope to return in the near future!
Read More......
Subscribe to:
Posts (Atom)