Shamelessly reposting the occasional tutorial from my old blog. About three years ago, I had some kids in my life that I thought would get a kick out of play food. I gathered up a bunch of felt, embroidery floss and poly-fill (etc.) and made up quite an assortment. Following are the steps for making my favorites, the cherries. (Inspired by the second section on this page.)
Materials: Felt (I used a wool/poly blend in a splotchy red/black), .5 mm brown leather cord, embroidery floss, needle, scissors & filler (e.g. felt scraps, polyfill, etc.) Note: I really recommend felt with some wool content.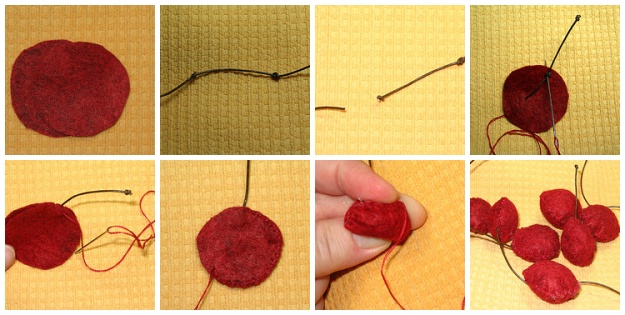
Top row, left to right:
- Cut 2 circles (1¼ - 1½") for each cherry.
- Don't cut the leather cord yet. First, tie a double knot about ½" from the end (don't need to be real precise - just need to have something to grab and pull), then about 2" from that, tie a single knot and pull TIGHT.
- Cut close to the second knot. This is the tip of the stem.
- Cut about a 15" length of embroidery floss and separate. I used 2 strands. Thread needle and tie a knot. Insert the needle through the first knot in the "stem" and push the needle through a single layer of the "cherry." Pull thread through. The 2 knots will be hidden inside of the cherry.
- Lay the second layer over the first. Start sewing by stitching very close to both sides of the stem, then continue around the circle, using a tight whipstitch.
- Continue stitching until you're just a little past the halfway mark. Stop and stuff the cherry with felt scraps or polyfill. Sew shut.
- You could be done now, or you can take another step and SQUISH the cherries so they look a little rounder. Tip: if your cherries have some wool content, then you can mist them with a little water prior to the SQUISH, and they should dry in a somewhat round shape.
For fun, I used parts of a felted wool sweater to make a huge, catnip-stuffed cherry for our cats. It was quite a hit. (Craft felt is not recommended for cat or dog toys, regardless of what they sell in stores. Take it from someone who has had a cat ingest and poop out an entire toy.) Read More......